
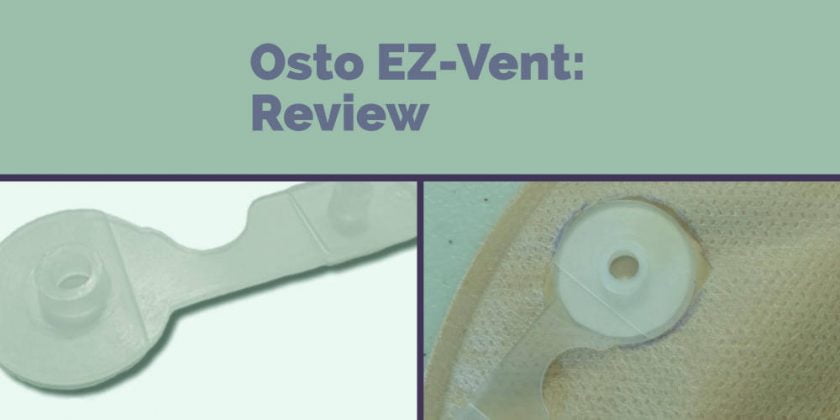
One problem that most, if not all, ostomates face is pouch ballooning.
Ballooning is caused when gas fills your ostomy pouch and has nowhere to go. The result can be a very inflated pouch that can end up causing a leak or even a full-on explosion!
Needless to say, current pouch designs do very little to help, and while most pouches can be purchased with a filter, they often become clogged quickly, especially with liquid or loose output. “Burping” your appliance will only work if you have a coupling that opens like a Tupperware container, but even then there is a risk of releasing more than just gas (yes, this has happened to me).
There is a unique product which aims to overcome this challenge. That product is the Osto Ez-Vent.
I’m excited to review this product because overnight ballooning has been an issue for me, and while I’ve never experienced a leak, it is still quite alarming to wake up to a pouch ready to burst.
The Osto EZ-Vent attaches to your pouch (apparently any pouch) and when you need to release some gas, you simply open the small valve when it’s convenient for you and you’re done.
It sounds easy, and it is but there is a process you must follow to attach this product to your pouch. You can follow the link below for instructions on how to install the vent onto the pouch.
There is also video instructions available on that page too.
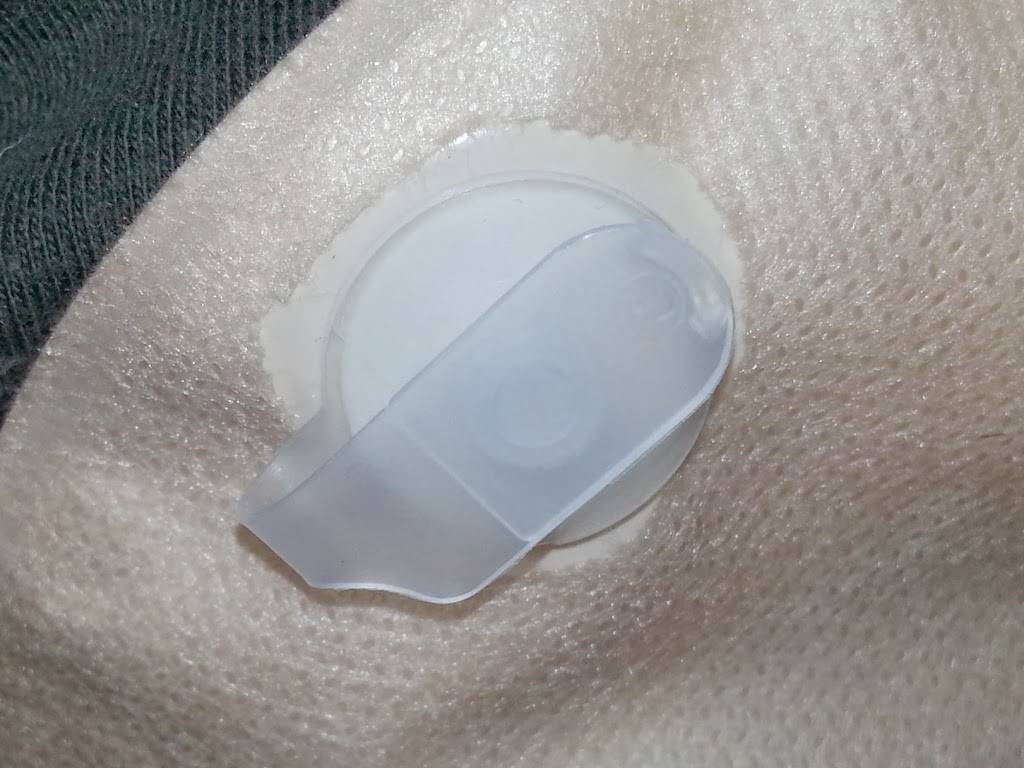
I’ve use the Coloplast Sensura pouch with filter during my tests (Coloplast #11125), but i keep my filter blocked with the sticker that’s included with my pouches.
Tip: If you’re using the newer Coloplast Sensura Mio bags, you may have difficulty applying the EZ-Vent. I’ve written a special article about it HERE.
I also mount the Osto EZ-Vent onto the top left position (rather than centered on the top) so that when I rotate my pouch horizontally, which I do when wearing the Stealth Belt or a wrap, the pouch contents are less likely to get in contact with the EZ-Vent.
A few things to note regarding the installation of these vents
- I usually batch-install these vents for about a month’s worth of pouches. That allows me to always have a pouch ready to go with the Osto EZ-Vent in case of an early pouch change. This also gives a 24h+ delay to allow the adhesive on the vent to stick to the pouch.
- My pouch has a soft, fabric layer around it for comfort. Because of this, I do have to make a hole in the fabric to expose the plastic layer which the Osto EZ-Vent sticks to. To do this, I simply trace the Osto EZ-Vent and cut around it. If your pouch doesn’t have the additional fabric component (i.e. transparent pouches), then you’ll save time on this step.
- If you’re an ostomate who has problems with joint pains or arthritis in the hands, you might want to have a friend or relative help.
The EZ-vent locks quite securely and even a very ballooned pouch won’t cause the vent to open on its own. It has never caught on clothes or anything like that.
One of the nice things that I like about this product is that they offer a nice enhancement to the quality of life as an ostomate.
Using a drainable pouch, these vents will stay on until your next appliance change and I usually put vents on several pouches at a time, so I’m always prepared for the next appliance change. If your vent get soiled, simply clean it the next time you drain your pouch.
If you’ve installed it on the top part of your appliance, and you use the product when standing or sitting, the pouch contents shouldn’t interfere with the venting process.
I should add that gas from your pouch, like the gas in a traditional fart, will smell. If you weren’t breaking wind around family and friends before your ostomy, you won’t want to start now. Be courteous and mindful of where you vent your pouch.

At the time of this writing (Jan 2022), the cost of 10 Osto EZ-Vents (one pack) is approx. CDN$24 and about US$15. Shop around for the best price.
This product should be covered by all insurance policies that cover ostomy supplies, but the manufacturer’s website states that Medicare will not cover both the Osto EZ-Vent and filtered pouches, so be aware of your particular policy before making a claim.
This product is sold worldwide and you should be able to get samples from any supplier carrying this product.
Bonus: You can also use the Osto EZ-Vent to irrigate your bag. Details HERE.
Highly Recommended
For anyone who’s had issues with pouch ballooning, I can’t recommend this product enough. It’s so ingenious that I’d like to see vents as a standard on pouches.
I feel so confident about this product, that I’ve started ordering filterless pouches (Coloplast #11135) for future wear.
There is an odor eliminating filter which can be used with the EZ-vent. I haven’t tried them at the time of this review, but I’ve requested samples and will follow up with another review once I receive them.
For more info, visit https://www.kemonline.com/
Note: I’ve reviewed a filter, that is made by a third party and not endorsed or affiliated with the company behind the Osto EZ-Vent HERE.
Question: Do you have a problem controlling gas in your ostomy pouch? Have you tried this product?



Okay, welcome Shazzon…Please do not call me cheap, but rather frugal? maybe. For financial reasons, I was desperate to try and get more then one use out of my Vents that I pay 3o$ for in Canada. I do not get a rebate on my insurance for them." I" do reuse the vents. It is out of trial and error but I would gladly share my tips with anyone on this matter to help them avoid the fuss. We have to install them ourselves, new or used, so I did what is easier and pain free for me. I clean the surface of the bag with a 99% alcohol that you can buy from behind pharmacy,have to sign for it when you buy it. The higher alcohol I use for a few things. We must take the shine off the bags in order for the vent to successfully stick to the.This is not something you would want to fall off because of voiding this step. If you are not sure the shine is off fan it a couple seconds and then step back and take a look. If not looking like it, then scrub again. The stronger alcohol means I do not have to work to hard at it or too long. My bag shine is stubborn and has attitude. Recently there was a shortage of it so you also may want to buy a few to stick aside just in case. When one drug store is out, check with another, they may have some. I have arthritis my hands and bent fingers, were very sore and swollen for many days the first time I applied the vents and fought with cutting the holes. Now I use the strong alcohol, I get little to no pain. Because you are using the vent for something like the bowel fluid, I also use alcohol squares to clean it every day. They are also more portable. I clean all of its surfaces and I do the face of the bag also. I like to do this at night or before I got out. To clear the hole if it gets plugged, I take a square of toilet paper and fold it in half to make a triangle, then I fold it to the center and from there as tightly as I can I make a fine rolled point of it and then about an 1/8″ from the point I bend it with my finger nail. I then take that point and keeping the bent section bent, I place it in the hole and angle it in, as far as it will go, then gently twist it around. This clears the sides and the some base. Use the bag itself to help you clear the bottom also. This is where I tell another thing I have learned. I use the Hollister bag with the charcoal vents in it and my osto vent, I have found that if I fold that section of bag over towards the floor, tape it if your pants won’t hold it in place. When I need it to work, and it look there is moisture gathering I pinch my finger and thumb together over both sides of it and slide to the left. If your hands won’t slide use a square of TP over the plastic and vents. I also had my son cut off one inch long sections of a 1″ round wood dowel. I had him drill a hole in the center of the little dowels and sand the raw edges well. I use them to press the vent down for the recommended time suggested.This saves my finger tips something crazy. The hardware store can sell you a foot of pole and most likely cut it in one inch chunks for you also. I use a hair dryer,high to soften the vent base that goes on the bag. I find it adheres quicker and better and no, I have never had a vent come off even with all the bending down I do. It only takes to the count of five or ten to soften the disc on the vent, and you my wish to hold it with pliers while heating it if your drier is to hot and you are wearing a ring. You do not want to dry it out just soften it some. Once on and used I am very pleased with its function and stick. I carry with me a sample bottle of the air deodorant that Hollister? sent me… I use this in case I am travelling with others and have to release the air and can not stop the car. I spray just before hand and immediately after and ask for windows open please. Be sure not to shoot the driver in the eye with spray. Now, about re-using the vents. If you are driving, just be safe and pull over when you can. It is so not worth the risk and it is important.I also use the 99% alcohol to plop the vent in when I cut them off the well rinsed bag for “re-use". After I rinse my bag, before I change to a new bag, I immediately cut it off the bag and gently place it in a “smaller size hair spray cap" to soak once off. I chose a smaller cap because it was smaller but also slightly taller and I thought it holds less alcohol to cover the cut off vent. I cut it roughly off at first but still close to the vent you trim it later. Once done with the change, I let the vent soak in the alcohol over night. Then after a good hot water rinse, thru the little hole too, I cut off as much plastic as possible. Try not to damage the white sticky part you stuck to the new bag when you attached the vent the first time. I have made a slight cut and once took a small chunk out of the white part and It did not prevent sticking, I just ere on the side of caution. When done, I dump out, rinse and refill the cap with clean alcohol. I soak the vent in it again for a few minutes. Another hot rinse and then I place it on a piece of paper towel or TPr to let air dry thoroughly. It does not work well to re-use a vent without that little white softer circle ( lets call it a washer…it looks like one only it is soft and very sticky) on the base. I have tried it and it can be peeled off rather easily when reused and reattached without the washer. I found that out when one fell thru my pant leg and on the floor. I had made up 8 bags without the washer and used them, but I was very careful about my movements, the one that fell off was the only one that did. I have reused them up to three times. After that, I would loose pieces of the vent top. To help open the top off the vent when on a bag, I apply reassure to the bottom of the vent with my thumb on my other hands. Before you set to re-apply a used vent lightly sand the base with a very fine sand paper. Clean and dry it well if you rinsed with water. Work it about four times before you have to use it, this just loosens it up some. Before you glue it on, figure out where you want to place it and mark the area on all bags so you always find it in the same place.I have also tried several different glues and find that crazy glue works best by far. Apply glue to vent over a paper of sorts. It is very liquidy and runny so do not over use it, but at the same time use enough to make sure there are no areas on the base missed. Take your time with this project. Attach the vent, have ready your little section of dowel or a coin if you choose. One end should be drilled to fit over the post on the vent and the other not. To avoid gluing your cap to the post, use the undrilled end first to press down on the vents little hole and then when and if you are sure about the glue not being on the exposed surface then you can place the drilled end over the post and press down with firm but gentle pressure and hold down few minutes or so. You may wish to use a coin instead. Leave the bags dry over night then the next day cut your hole or as I do, I very very carefully melt the hole in my vent open. I use pliers that lock, or a medical clamp, to hold a piece of wire that I heat on the stove. I do all ten bags at once so my kitchen looks somewhat like a factory for two days, but it is worth it. A piece of wire hanger is bout the right size. I use a nut pick. Be very sure to melt only the place you need to cut the hole and not right thru the other side or lower in your bag. I have done it and had a slow leak and had to figure out where it was. Practice first moving the plastic of your bag out of the way of any other part of the hot wire. You have to hole the vents base in order to get a good grip so please be very very careful of your hands and finger, arms,..all of you feet also. Do it over a hard surface just in case you drop the hot wire so you do not melt a hole in you linoleum floor. This is starting to sound like a disclaimer. If you are shaky at all do not attempt to do this alone, ask for help especially if you are under 18. This is also not what Eric would recommend or this site or the company. I did this because I live alone and needed to simplify a procedure that caused my painful my hands. Once your glue has had over night to set, just simply give a light slight tug as tho you were about to peel an orange but not enough to purposely peel off the vent. I do this for my own peace of mind. If I were to bend down to put the vest on my little dog and it could not take that pressure or little move I would not be telling you what I do. But I have found this works. However, every time I empty my bag, I check the security of the vent. I have not had a vent accidentally come off on its second or third reuse cycle. I can not accept responsibility if your vent falls off, this is what I do to meet my needs, but it does work and I find it works well. Play the scenario out in you head before hand and have everything you need handy from the start. I am really pleased with how it works, and even during the heat of summer they have stayed on…and the bath tub. Good luck if you try this. It takes time but it also saves me another 30 bucks.
Linda, Payless Medical and CanMedDirect (both online stores) sell the EZ-vents for $22 / 10. If you can hit their limit for free shipping (not hard to do!), then shipping is free. That’s the cheapest I’ve found.
The person we talked to at Shield Heathcare ( where I get my supplies) said that Medicare classifies Osto EZ-vents as ‘accessories’… and thats why they don’t allow one per bag.So, go figure.
Dona, yes the accessories — Don’t get it at all– one would think the powder is among the accessories!! I am getting over loaded with the adhesive releaser spray and those are only allowed every 3 months. Go figure huh ???????? I can give some out at my support group to those that don’t have good insurance. And what is left over is sent to a special area of the USA Ostomy for distrubition. You can get either the wipes or the spray— I like the spray—–as I want a clean dry skin for the wafer……………………………
CHANGINF THE WAFER.POUCH…….. Ever have your stoma belt out a strong song of fluids while changing? This is what I now do–
Save your toilet paper card board roll- fill it with tissue (soft) (I have this roll on counter and stuff it with torn/crumbled tissue.. )
remove the pouching system, wipe clean skin. Press lightly the card board with tissue inside and let that take in the song of out put.. NOW u can air dry nicely and no hard rubbing.
YOU HAVE TO HAVE YOUR NEW POUCH (MY NELLIE’S DRESS) READY!!!!!!!!!!!!!!!!!
Pressing LIGHTLY seems to hold back any songs (out puts) until I put on Nellies dress. Now I don’t have to wipe down the bathroom cabinets any more.. Every body is happy in my bath room…….…… :-) Nellie is very active and sensitive to any change of air This helps me alot!! :-D (thank God for our Imaginations huh ?) Best of all, this is not text book so it works!! :-)
That’s frustrating. My insurance company classifies ostomy hernia belts as “support bands" that fall under different rules than traditional ostomy belts do – so there’s a bit of a run around for those.
You really do need to have at least one per bag if you’re going to use these on an ongoing basis – have you tried contacting the manufacturer of the EZ-Vents to see if they can reclassify or work with Shield to help reclassify these?
Hi Marcie,I double checked…and Medicare does allow me 20 bags, 20 wafers, 20 barrier rings a month but only 3.3 EZ-Vents ( they send one pkg of 10 for a three month order). We have talked to the provider and they said that is all medicare allows. Not nearly enough for every bag.I am so happy to have the medicare though, but it would be nice if they revisited what people might actually need. I got so much stoma powder, I had them stop sending any more.
Dona, now u can get more bags, etc. in case there is no service etc. happening again.. what ever– ? (strange world or country now) Yes, I had to stop the powder also- they just kept sending it to me without asking– after what Eric said about it containing some wood splinters fine ones any way– and I really never thought it helped me much in the first place. I use drug store –Desenex" antifungal. when I get issues, the NU-FLEX is great. the wafer is wonderful!! HATE the pouch. But it helps me get out of rash’s etc. The barrier/wafer is smaller. You can order round or oval shaped wafer. I use the round. IT sticks VERY well. So I have a box on hand always. Now that you get 20 pouches, and your above water with them, you can order other pouches like this. :-) Merry Christmas. M
Hi Shazzon,Yes, they cost about 1.65 each from Amazon. ( ten packs). Offhand I would say they may not be reusable, but I haven’t tried. I did give it some thought though…The main problem would be to get them to stick properly to the next bag. Maybe some kind of adhesive could be used though.You would have to clean and sterilize them really well too.Its probably worth a try anyway. And, if you do try to make it work , please let us know what you learn.I am lucky to have medicare. BUT… they provide me ten bags a month and only three EZ-vents. So I always have a monthly shortage. We have talked to the provider ( Shield Heathcare) and thats what they say they are allowed to include under medicare. Odd!I do hope one of the manufacturers will begin to make bags with vents like this. The filters really do not work.
Dona, Medicare gives me 20 bags per month– (I have secondary insurance plan B) do u? They always gave me 20 bags.. ex vents I should try to get tho-scared it will leak.
Can this ez vent be reused as they are fairly expensive when you don’t have coverage .