Wouldn’t it be nice to have a better way to flush your drainable ostomy bag with water every time you empty it? Here’s a cool trick using a product you may already be familiar with.
This tip will benefit colostomates and ileostomates who have thick output. Urostomates won’t have to worry about this.
Table of Contents
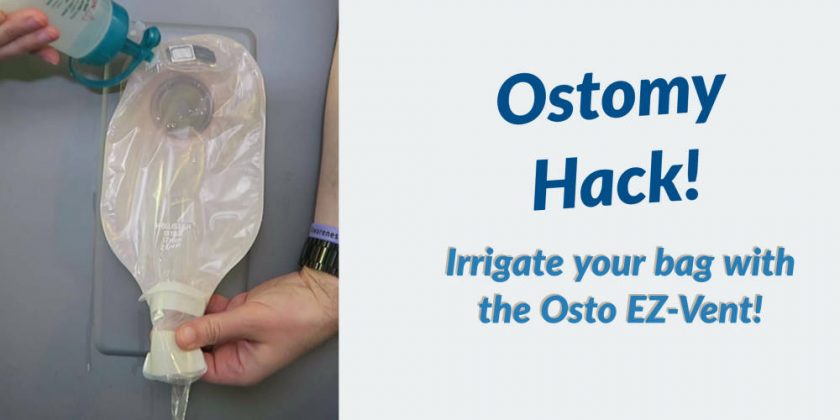
Video
This will video will give you a quick overview on how to set things up and how to clean your ostomy bag using this trick.
By playing the above video you agree to YouTube's Terms and Conditions and Privacy Policy
Introduction
Some ostomates like to rinse their drainable bags every time they empty it. It’s not necessary, but it can help if you have problems with pancaking, and many ostomates simply like the feeling of wearing a totally “clean” ostomy bag. This can also help if you have difficulties emptying your appliance due to arthritis or other condition in your hands.
This desire has led several manufacturers to come up with their own custom appliances such as the “EZ-Clean System” by Schena Ostomy Technologies or the appliances by Ostomy SuperSan.
But while those systems offer some unique benefits, they also come with several drawbacks:
- You have to use their appliance.
- Not easily available everywhere.
- May require special equipment to be installed.
- Expensive.
- Appliances may not suit all ostomates.
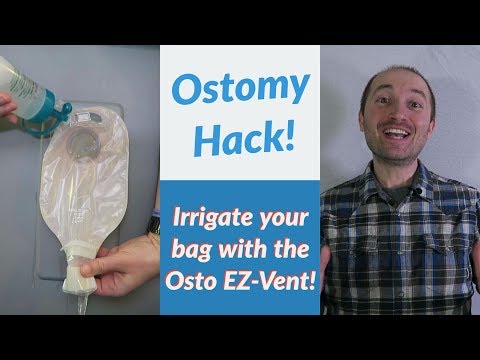
The method that I’ve come up with uses the Osto EZ-Vent (a product I’ve reviewed before) to achieve the same goal – with several other advantages.
Why my solution is more ideal:
- Way cheaper.
- Works on just about every drainable ostomy bag.
- Can be used when your bag is in the vertical or horizontal position.
- Doesn’t interfere with your bags filter (although using a filterless bag is ideal).
- Doesn’t require special equipment to be installed on your toilet.
- Still, allows you to “burp” your bag through he EZ-Vent.
- May be easier to use than pouring water into the bottom of your bag.
In addition to offering you a better way to rinse your ostomy bag, you can also use the Osto EZ-Vent to relieve pouch ballooning (which is what it’s made for!)
Things You’ll Need
- Osto EZ-Vents. (Buy on Amazon.com)
- Drainable ostomy bags. Nearly any bag will work, but ones without filters on top may be more practical for this application.
- A squeeze bottle that fits the EZ-Vent.
- A pair of sharp scissors (for the EZ-Vent install). Cuticle scissors work really well!
- (Optional) Rubbing alcohol. This can be used to clean the surface of your bag to help the EZ-Vent stick better.
Finding a bottle that fits the EZ-Vent will probably be the most difficult part of this entire process. You may be able to find loads of appropriate bottles online, but I’d suggest visiting your local dollar store with an EZ-Vent in hand and “test” the tip of the bottle to make sure it fits securely over the vent opening.
The bottle I use was found at a local bulk foods store and I hadn’t even purchased it to irrigate thought he EZ-Vent – it just happened to fit perfectly!
You can order the same one on Amazon.com if you don’t want to search around.

Attaching the Osto EZ-Vent
Attaching the Osto EZ-Vent to your bag takes less than a minute. You’ll save time by using a bag that has no cloth fabric on the front, but you can also cut out the cloth in the small area where the EZ-Vent will be attached to (I’ve done this many times!)

Step 1: Prepare your bag and Osto EZ-Vent. 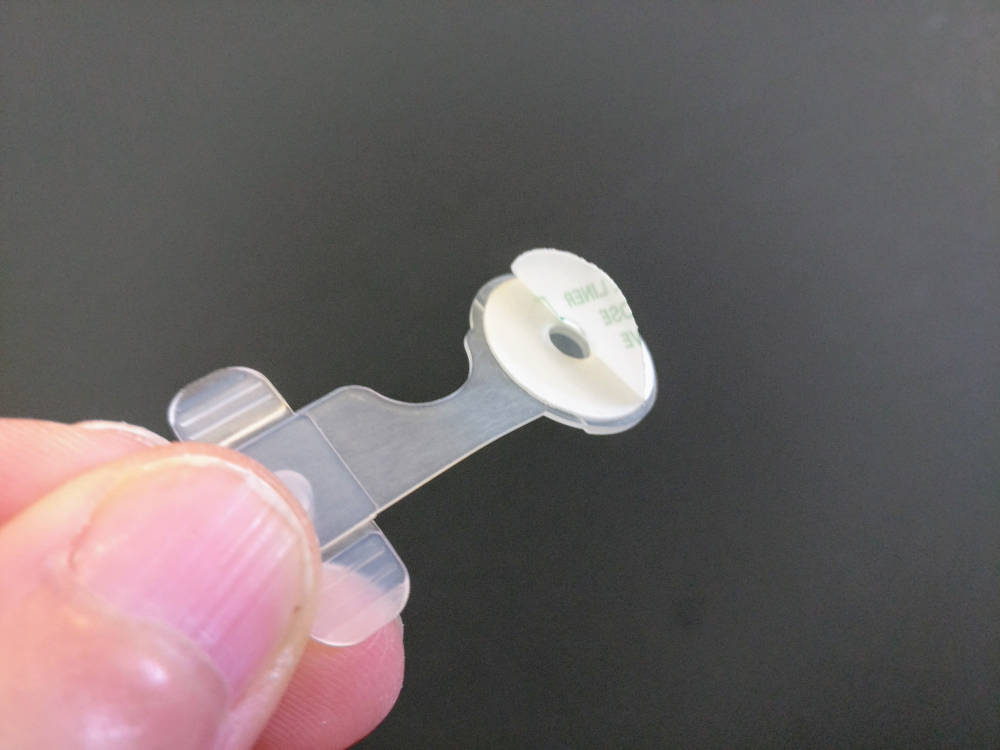
Step 2: Remove the release liner on the back of the EZ-Vent. 
Step 3: Place the EZ-Vent onto your bag and press. 
Step 4: Expose the bottom of the EZ-Vent from the inside of your bag. 
Step 5: Carefully open a hole in the bottom of the vent. 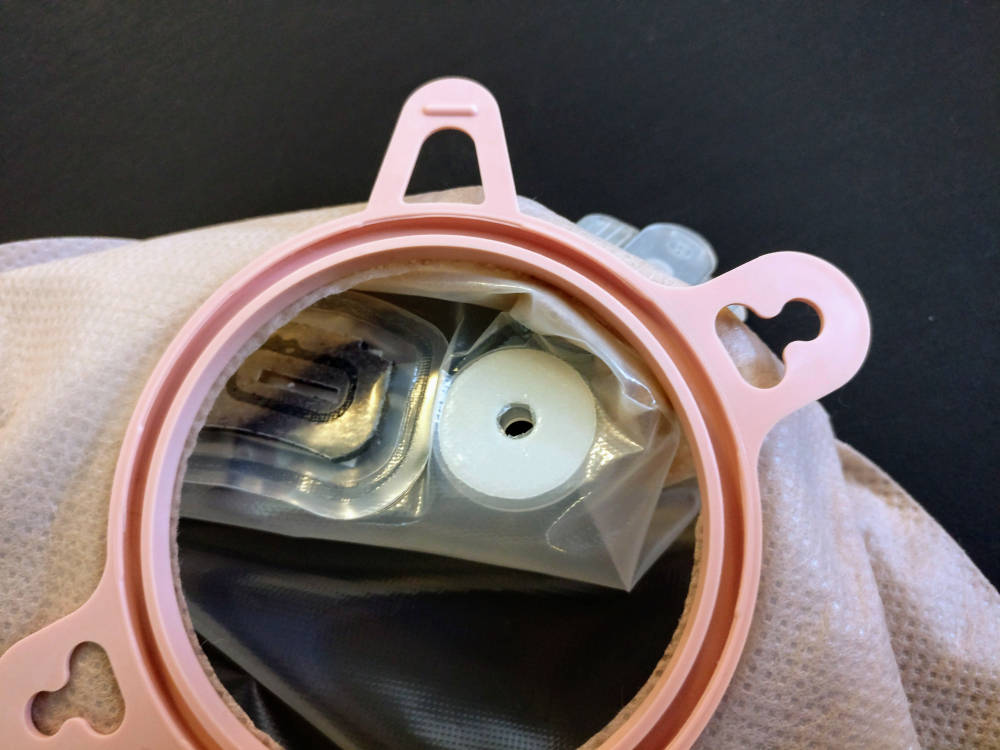
Step 6: Check to make sure the hole has been cut and there are no air bubbles. 
Step 7: When ready, connect a bottle of water to the EZ-Vent and irrigate!
Irrigating Your Ostomy Bag
Here’s the fun part! You’ll probably want to take it slow the first few times you do this, or until you get the hang of it.
- Position the outlet of your bag so that it’s facing into the toilet.
- Open the bottom of your bag and allow stool to fall into the toilet.
- Open the Osto EZ-Vent.
- Secure the tip of your squeeze bottle over the EZ-Vent’s opening.
- Gently squeeze water into your appliance through the EZ-Vent.
- Once your bag is clean, detach the bottle, close the EZ-Vent, clean and close your outlet normally.
TIP: I usually refill the bottle at this point so that it’s ready for the next time.
Notes
- While I prefer to empty my bag before rinsing it clean using this method, you can also keep the outlet closed and add water to your bag before giving it a little swish. Be careful when doing that as it may be a little messy :)
- If you wear your bag sideways, like I do, then you can place the vent in a better spot depending on which way your bag points to.
Question: Have you tried this trick? Let me know what your results were!


@shark … Hello and welcome to VO! Your in the right place for any kind of tips & tricks & encouragement you might need.
I know the Colostomy output is different from an ileostomy which I have but we can still deal with pancaking issues. I use the M9 liquid deoderant and when need be I use / purchase a gel type liquid deoderant to put in my pouch too. I have used the 2 together. The spreading around of that gel can be done by massaging the sides of the pouch together & moving the gel up to where you need it with the pouch itself for a more slippery express route of its contents. It does have to be reapplied each time & takes very little effort to use & spread it around up near the top and around your stoma in the pouch. It comes in a portable tube like material. I use 1/2 (a tube) at a time.
I have 3 small disposable plastic cups from $amma that I pour water 1 at a time into my pouch & hang onto the end squeezing closed & place a square of tissue in the open end to prevent any water from splashing out on me or my clothing. I then gently shake the pouch around to get the water where I need it & to loosen output & it works pretty great. For sticky output material you can rub the sides of the pouch together to loosen output after the 1st rinse. I have had to use 3 cups of water at times but rarely because of the mostly always liquid output I have. I do fill 3 disposable cups just incase I need that 2nd or 3rd rinse. If I don’t you can be sure I’ll need them all! Lol!
To clean the opening or dry it I wrap a few squares of Tissue around my index finger & push up from the outside 1st cleaning or drying the outside then into the opening to dry it there. This has saved a lot of tissue use in the past. I use 2 or 3 squares & place my finger in the center from a corner, fold up towards the other corner to make like a triangle only with my finger in the center & then wrap it around my index finger holding it in place with my thumb until its in my pouch, work from one side to the other drawing it outwards. I hope this is helpful!
@veganostomy I have a sigmoid colostomy, so it’s pretty far down where things are going to be mostly solid. I will try adding water. Also do you know of any info on your site about colostomy irrigation? It didn’t come up on the search but this is new to me and I’m bumbling around still. 😜 Thanks for answering so fast.
@shark I have a sigmoid colostomy too, so I am able to irrigate. I don’t do it regularly, but if I want a period of time (usually 24 – 48 hours) without interruptions for emptying, that’s when I will irrigate. There is a lot of information on YouTube about colostomy irrigation; have a look there to give you an idea of what to expect. If you want to try it, I’m happy to walk you through my routine, step by step. It’s always a good idea to check with your doctor and/or stoma nurse first, but I have found that they aren’t necessarily very knowledgeable about irrigation, as most ostomates don’t do it. I should tell you that there is a belief, even among professionals, that irrigation causes a hernia. I have asked that very question of the top colorectal surgeon in the country, and he was emphatic that it doesn’t cause a hernia. My own surgeon agrees.
Irrigation looks daunting until you actually do it. It’s not nearly as complicated as it seems, and it only takes one try to get the hang of it. Like anything, practice makes perfect. People who irrigate regularly find that it trains their bowels to expect flushing at a regular time, which allows for much more control for the ostomate. Let me know if I can help.
Laurie
@shark Thanks for being here.
Do you have a colostomy or ileostomy? When my output is really thick, and I don’t use a pouch lubricant, i do tend to add a bit of water to the bag to get things moving. This often happens when I’m emptying it 👍
The instructions for this irrigation seem straightforward and thanks for the info or an irrigation bottle on Amazon. And thank you for this site- like, who else could I discuss these issues with? So I’ll try this. I’m new at the whole thing, 10 weeks out from surgery. I’ve been quite discouraged at ever getting a bag cleaned out. Nothing ever falls out of my bag it has to be squeezed out. this is with several quarts of water, a pint of coffee in the morning and daily stool softener. I tried rinsing out the remains with a hand held shower head and it’s impossible to really clean the bag well- lots of residual material sticking to the wall. i have had lots of trial and error blunders but I’m getting the hang of it.
New to the ileostomy family (2 weeks!) — and this is genius. I had my ostomy nurse order me some of the vents right away since I am a gassy person in general. One thing I am finding is that it’s hard to get bag lubricant all the way near my stoma, so sometimes my thicker stool will collect up there when sleeping, and it’s hard to get out. I found a squeeze bottle at home that fits and tried this out, and it’s great! I think this will be part of my morning routine — start the day out fresh haha.
Hi Stephanie, welcome to the club 😄
Glad this helped👍